
06 Nov Joy Centerpiece – HCB Week 4

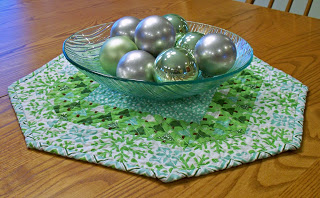
Welcome to my project for week 4 of the Holiday Craft Bash! This week Meredith asked us to make toys or some sort of home decor. My girls are in their late teens and I’m not much good at 3D objects so I decided to make a small holiday centerpiece (just under 18″ diameter finished). While I love table runners, when you use a table every day, sometimes they feel like they just get in the way. Something smaller that didn’t need to be moved all the time or make me fret if salad dressing got spilled on it seemed just the thing.
I bought a layer cake of Joy by Kate Spain from Pink Castle Fabrics earlier this year (I think Brenda has sold them all now) and the prints were just what I wanted for this piece. The layer cake pieces weren’t quite big enough, so I made a quick trip to my LQS for a few fat quarters and I was in business.
Here’s what you’ll need:
Fabric A (center): 8″ x 8″ square
Fabric B: 2 3½” squares and 4 3″ x 8″ rectangles
Fabric C: 4 3″ x 8″ and 4 2½” x 9″ rectangles
Binding: approx 60″ x 2½”
Batting and Backing: 22″ square

Sew the 3″ x 8″ rectangles from Fabrics B & C together on the long sides. If your B print is directional as mine is, sew the “bottom” of B to the “top” of C. Press toward C. Make 4.

Cut the 3½” squares on the diagonal to make 4 triangles.Mark the center of the longest side of each triangle with a pin. Match, right sides together, with the center of a 2½” x 9″ rectangle. Stitch and press toward the triangle.

Line up the corner of your ruler with the corner of the triangle. Trim excess Fabric C rectangle to make a B/C triangle.

Lay out your centerpiece in three rows as in the diagram. Sew the three pieces in each row together. See below for the top and bottom row.

The triangle units are over-sized, so in sewing them to the rectangle units, match the B/C seam and not the edges. I put a pin 1/4″ from the raw edge at the B/C seam on each piece and pinned it in place.

Your top (and bottom) row will look like this:
Notice that the triangles are bigger than the center rectangle on both the top and bottom edges.
 Trim the triangles on the long edge even with the center rectangle unit.
Sew the three rows together. You can trim the outer triangles now or wait until you have quilted the centerpiece.


Layer the centerpiece with your batting and backing and quilt as desired. I quilted my centerpiece by sewing a big “X” through the middle of the piece and then echo quilting inside each of the sections.

Now you are ready for binding! It might look tricky to bind an octagon, but it really isn’t. Miter the binding corners the same way you would on any quilt and it will work out fine.

If you are interested seeing more projects with Joy, hop on over to the Fat Quarterly blog (or Moda Bake Shop) where they are showing a quilt and pillow from their Christmas issue.
Don’t forget to check out the projects by Jessica (yesterday), Meredith (Wednesday) and Jacey (Thursday) and to add your projects to the Flickr group to be entered to win prizes each week!
Helen Elizabeth Liddall
Posted at 20:25h, 10 DecemberI am a newbie with patchworking. When you give the measurments, ie 8×8 square, is this the finished sized square or do I need to add 1/4in more?
Shirley Aiken
Posted at 11:11h, 19 JulyJust made this for a swap and it was fun and easy
Suzanne Lopez
Posted at 13:53h, 03 OctoberPretty.
Jacey
Posted at 22:03h, 07 NovemberSuper sweet, Debbie!
Sally
Posted at 01:07h, 07 NovemberThis is really pretty! I love the design and think it would look perfect on my "coffee" table
kate@katespain.com
Posted at 13:24h, 06 NovemberDebbie!
What a fresh, fun, and creative approach to decorating the table. Love it!
kate
Charlotte
Posted at 12:38h, 06 Novemberthat's really nice! I totally agree with you about the runner issue, with the addition of it being pulled off the table by the puppy!