
30 Oct Winter Night Pillow – HCB week 3

How’s your Holiday Craft Bash going? Have you made anything yet? Don’t forget to add your projects to the Flickr group to be eligible for prizes each week and the Grand Prize. Check Meredith‘s blog for more details.
This week is pillow week.
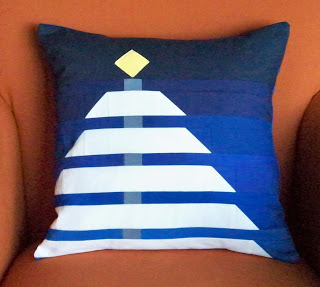
Be sure to click over and see what Jessica (yesterday), Meredith (Wednesday) and Jacey (Thursday) have created. By lucky coincidence, I got to meet Jacey at Quilt Market a few days ago. We had a great time putting a face with a name and talking about getting all our projects for the Holiday Craft Bash finished each week :)On to the project! Since pillows aren’t as closely identified with Christmas as stockings and tree skirts, I decided to take this opportunity to make a winter-themed project. The icy blues of a winter night always appeal to me. In fact I have made two other winter night projects. I couldn’t resist making the tree top yellow – the idea of light and warmth in the winter night seems so happy to me. However, if you’d like, you could substitute white fabric for the yellow to continue the color of the tree itself.
Be sure to click over and see what Jessica (yesterday), Meredith (Wednesday) and Jacey (Thursday) have created. By lucky coincidence, I got to meet Jacey at Quilt Market a few days ago. We had a great time putting a face with a name and talking about getting all our projects for the Holiday Craft Bash finished each week :)On to the project! Since pillows aren’t as closely identified with Christmas as stockings and tree skirts, I decided to take this opportunity to make a winter-themed project. The icy blues of a winter night always appeal to me. In fact I have made two other winter night projects. I couldn’t resist making the tree top yellow – the idea of light and warmth in the winter night seems so happy to me. However, if you’d like, you could substitute white fabric for the yellow to continue the color of the tree itself.
Winter Night Pillow (16″)
Supplies:
All Kona solids
Navy: 5¼” x 16½”
One 2.5″ strip x WOF each of Nightfall, Marine Blue, Deep Blue,
Ocean and Surf
White: one 2″ strip x WOF and one 2½”
strip x WOF
Slate: 1¼” x 7½”
Yellow (misc from my stash): 2 1½”
squares
Back: 2
12″ x 16½” pieces
To try and avoid confusion about which blue is
which, instead of referring to them by color name, I’m going to start at the
top of the pillow with “Blue 1” and continue to the bottom with
“Blue 6”. If you are using the
colors I used, here is the key:
which, instead of referring to them by color name, I’m going to start at the
top of the pillow with “Blue 1” and continue to the bottom with
“Blue 6”. If you are using the
colors I used, here is the key:
Blue 1 = Navy
Blue 2 = Nightfall
Blue 3 = Marine
Blue 4 = Deep Blue
Blue 5 = Ocean
Blue 5 =
Surf
Surf
Cutting:
Blue 1 does not need cutting
Blue 2: 1 2½”square,
1¼” x 6″, 1¼” x 10″, 2 x 3½”,
2 x 7½”
1¼” x 6″, 1¼” x 10″, 2 x 3½”,
2 x 7½”
Blue 3: 1 2½”square,
1¼” x 6″, 1¼” x 10″, 2″ x
2″, 2″ x 6″
1¼” x 6″, 1¼” x 10″, 2″ x
2″, 2″ x 6″
Blue 4: 1 2½”square,
1¼” x 6″, 1¼” x 10″, 2″ x 4½”
1¼” x 6″, 1¼” x 10″, 2″ x 4½”
Blue 5: 1 2½”square,
1¼” x 6″, 1¼” x 10″, 2″ x 3¼”
1¼” x 6″, 1¼” x 10″, 2″ x 3¼”
Blue 6: 1 2½”square,
1¼” x 6″, 1¼” x 10″, 2″ x
2″, ¾” x 16½”
1¼” x 6″, 1¼” x 10″, 2″ x
2″, ¾” x 16½”
White:
Cut 5 2½” squares from the 2½”
strip.
strip.
From the 2″ strip and the leftover of the 2½”
strip, cut pieces 2″ x 3½”, 2″ x 6½”,
2″ x 9½”, 2″ x 12½”, 2″ x 13½”
strip, cut pieces 2″ x 3½”, 2″ x 6½”,
2″ x 9½”, 2″ x 12½”, 2″ x 13½”
Slate: Cut
5 1¼” x 1½”
pieces
5 1¼” x 1½”
pieces
Yellow: 2
1½” squares
1½” squares
Construction:

Draw a diagonal line on the back of the white 2½”
squares. Place them right sides together
with the 2½” squares from Blues 2-6.
squares. Place them right sides together
with the 2½” squares from Blues 2-6.
Sew ¼” from the line on each side of the
line. Cut along the line. Press.
line. Cut along the line. Press.
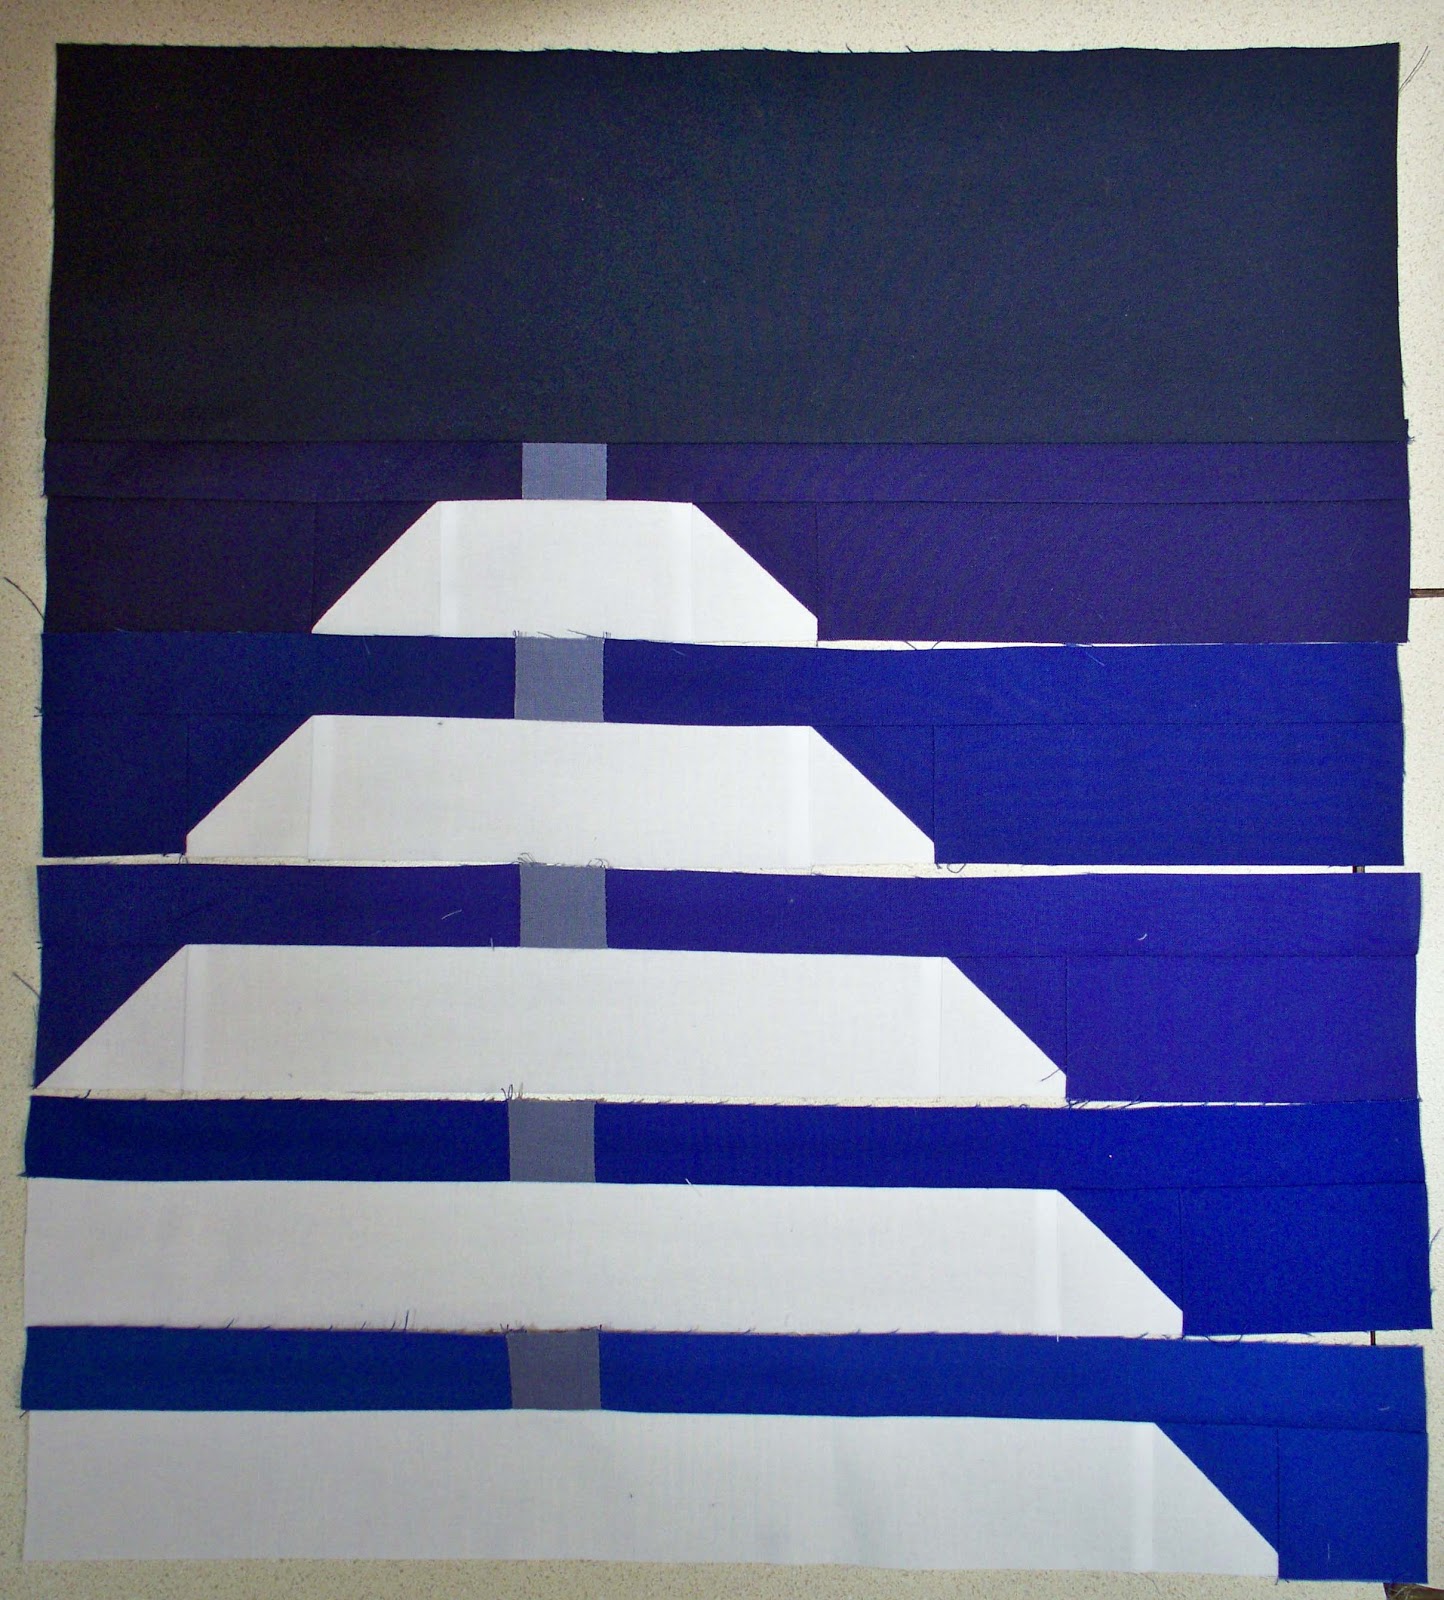
This will give you 10 Half Square Triangle (HST) blocks. Set aside one of the HST blocks
made with Blues #5 and 6. You won’t need
these for this project.
made with Blues #5 and 6. You won’t need
these for this project.
Lay out the rest of the pieces according to the diagram. (Click here for a larger diagram).

Sew the pieces together into rows and sew the
rows together into the pillow top.
rows together into the pillow top.
Appliqué the two yellow squares, one on top of
another, at the top of the tree using your favorite appliqué method. I used two squares to lessen the effect of
the dark blue behind the lighter yellow.
another, at the top of the tree using your favorite appliqué method. I used two squares to lessen the effect of
the dark blue behind the lighter yellow.
Back:
Press under 1/4″ twice on the long edges of
both pillow back pieces. Stitch along
the fold.
both pillow back pieces. Stitch along
the fold.

Place the pillow front right side up and layer
both back pieces, right sides down on top of the front, matching raw edges and
having the hemmed edges overlapping in the center.
both back pieces, right sides down on top of the front, matching raw edges and
having the hemmed edges overlapping in the center.
Stitch a 1/2″ seam all the way around.
Turn right side out, press, and insert a 16″
pillow form.
pillow form.
Tina Wemyss
Posted at 08:15h, 04 OctoberGorgeous, will make it in green and white and red in white as well! Thank you for the tuition!
sew katie did
Posted at 13:55h, 03 Novembersuch a nice crisp look!
West Michigan Quilter
Posted at 15:09h, 30 OctoberThis is so darn cute. I'll have to link to your post tomorrow. Thanks for sharing.