
28 Aug Linked Pillow-Along: Quilting
This post is part of the Linked Pillow-Along. If you are just joining, you can see the first post here, the supply list here, the cutting instructions here and the construction details here. Today we are quilting our pillow and next time we’ll be putting a zipper in the back and doing the binding.
[A short note of apology here: I need to reschedule the final Pillow-Along post for September 1, instead of August 31. I hope this doesn’t cause anyone too much trouble. I’m out of town for a few days with my family and I just couldn’t get it finished before I left. Time management is a constant battle!]
On to the quilting! First, the quilting design. I am a fan of fairly simple quilting. I just like the clean look of it. I think it is especially appropriate with this pillow. This small “quilt” has a lot of color contrast and pattern going on. Having said this, the blue squares are perfect for some more detailed quilting too.
I decided to quilt my pillow in the ditch with white thread. I actually thought about this when I was constructing the blocks and purposely decided to press away from the white to make the ditches easier to quilt in. This also helped avoid the navy and green seams shadowing through the white.

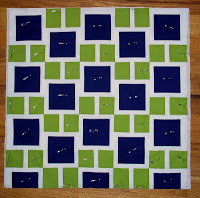
Here is my pillow ready to quilt – as you can see, I use a lot of pins. I rarely have trouble with puckers on the back of my quilts. I attribute this to careful backing/batting preparation and lots of pins. I didn’t think to take pictures of my preparation because what I do is fairly typical, but I’ll cover it here in case it is helpful to anyone.
I pressed my muslin lining and taped it to my table. Next I put the batting on top and smoothed it out. When I am making a bigger quilt, I always put my batting in the dryer for a few minutes with a wet towel to soften any wrinkles it has from the packaging. My favorite batting is Quilter’s Dream Cotton Select Natural, but I use others sometimes too. Next, I press my top, place it on top of the backing and batting and smooth it out too. Then I pin.
 Before I start quilting, I always take a few stitches on a layered scrap of the same fabrics or, sometimes, just near the edge of my project (I remove it afterward). I check that I’m happy with the stitch length and tension. I usually use a slightly larger stitch length when quilting than I do when I am piecing.
Finally, trim the top to 20″ square.
No Comments