
10 Feb And Now: The “Kiss” Pillow!

Just in time for Valentine’s Day or whenever someone you know could use a lift.
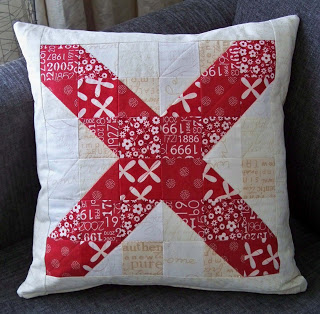
As in the “Hug” pillow, I used four reds and four creams for my pillow. Maybe it is the unseasonably warm winter we’ve had so far, but I felt like a lighter, springier look than with the “Hug”.
The “Kiss” block finishes at 12″ and the pillow at 16″. This is such a great scrap busting block, I’d love to see a whole quilt of them with lights and darks in place of the reds and creams. Or what about a quilt combining the hugs and kisses!
If you make a pillow or a quilt, please add it to my Flickr group. Have fun!
I’m linking up with Amanda Jean’s Finish it Up Friday.
I’m linking up with Amanda Jean’s Finish it Up Friday.
Finished size: 16″ pillow
Block size: 12″
Fabric requirements:
Cream:
8 2 1/2″ squares,
8 3″ squares,
2 strips 2 1/2″ x 12 1/2″,
2 strips 2 1/2″ x 16 1/2″.
8 2 1/2″ squares,
8 3″ squares,
2 strips 2 1/2″ x 12 1/2″,
2 strips 2 1/2″ x 16 1/2″.
Red:
8 3″ squares,
12 2 1/2″ squares
Batting, lining, and backing: 16 1/2″ square
16″ zipper
Construction Steps:
This is an easy pillow to put together. Just 16 half square triangle blocks, 20 squares and four “border” strips. Let’s get started!

Draw a diagonal line from corner to corner on the wrong side of the 3″ cream squares.
Place each square right sides together with a red 3″ square.
Sew 1/4″ away from the drawn line on each side of the line. Chain piecing these makes this go very quickly.

Press. Cut along the line. I use scissors at this point since you are cutting the seam allowance and it does not need to be an exact 1/4″.
Press the block open. I usually press toward the darker fabric.

Lining your ruler up along the seam, trim the blocks to 2 1/2″ square.
Layout the blocks according to the picture and sew the blocks into rows, alternating the pressing direction of your seams.

Sew the rows together. The “X” block should measure 12 1/2″.
Sew the cream 2 1/2″ x 12 1/2″ strips to the top and bottom of the block.
Sew the cream 2 1/2″ x 16 1/2″ strips to the sides of the block to complete the pillow top.
Layer the pillow top with the batting and lining and quilt as desired. My pillow is quilted with a red “X” through the middle of the “X”. I quilted double triangles in the spaces around the “X” and one line of quilting in a square around the border.
Using a 1/2″ seam, insert the zipper in the bottom of the pillow using your favorite method. Lining up the raw edges of the backing and pillow front, sew the remaining three sides using a 1/2″ seam.
Turn the pillow cover right side out, insert the pillow form and enjoy giving someone a “kiss”!
amandajean
Posted at 21:30h, 02 Marchi really love this! i would love to try it scrappy. thanks for the tutorial!
Amorette
Posted at 04:43h, 14 Februaryvery cute! i love the mix of whites and ivory for the background, it gives nice depth.
Quilt Inspiration
Posted at 12:47h, 12 FebruaryOh, very cute. I like the prints you used ! The flowers that are shaped like X's mimic the theme of the pillow. Your Hugs and Kisses will look great together in a quilt, which would go together quickly. Thanks for the tutorials!
Nicole
Posted at 22:27h, 10 FebruaryThat is a cute pillow! And an easy to follow tutorial. Love those HSTs! They are so versatile.
sallgood
Posted at 18:10h, 10 FebruaryLoVe both your pillows!
mtnquiltr
Posted at 18:05h, 10 FebruarySuch a cute pillow! Thanks for the tutorial.
Marianne
Posted at 15:18h, 10 FebruaryReally fine – Love it!